Pet-safe ways to deter and remove mice: seal entry points, eliminate food sources, avoid risky “natural” products, use enclosed traps, and clean dropping...
Article
•
Designer Mixes
Mouse Proof Home Entry Points

Shari Shidate
Designer Mixes contributor
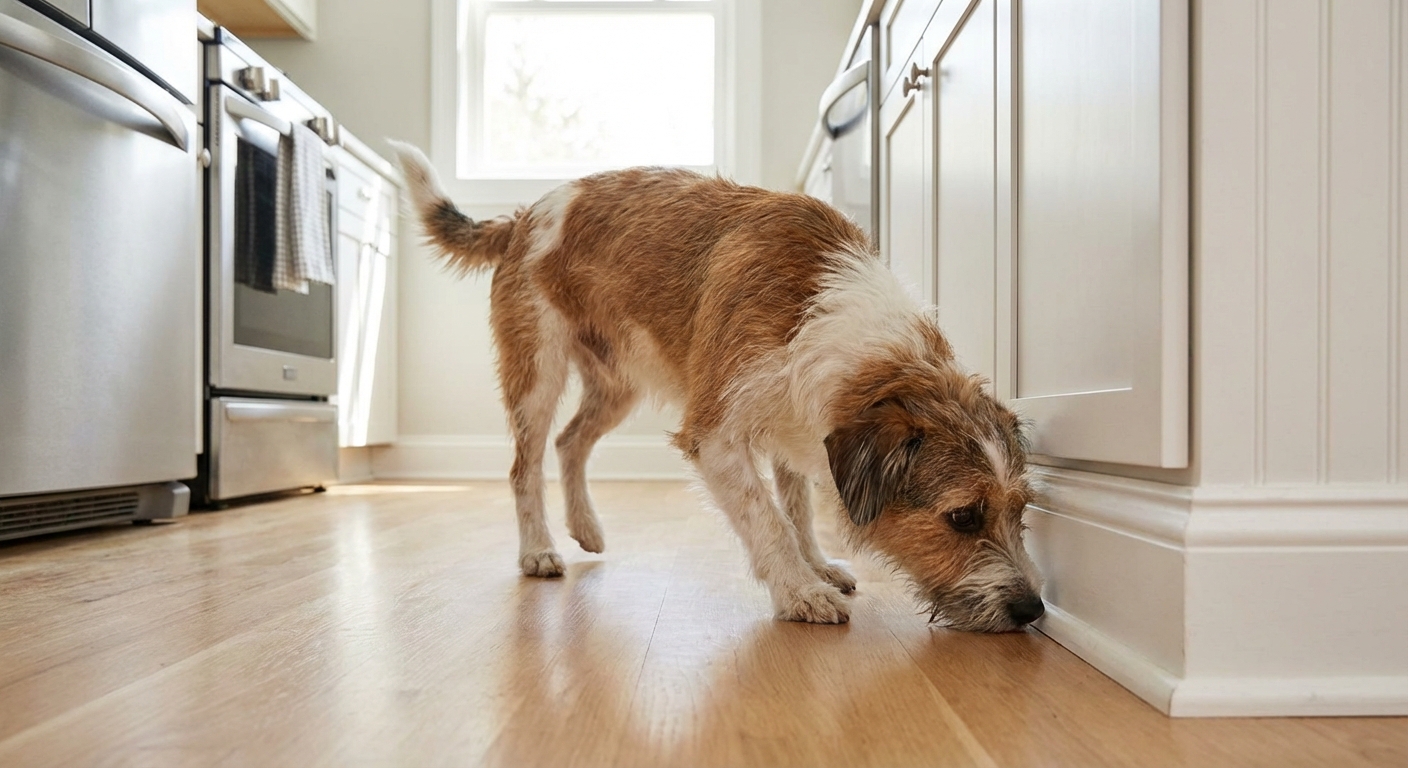
If you have ever found tiny droppings near a baseboard, heard scratching at night, or noticed pet food disappearing a little too fast, you are not alone. Mice are excellent at finding the smallest openings, and many infestations begin at the exact places we use every day: doors, garages, utility lines, and crawlspaces.
The good news is that mouse-proofing is very doable when you focus on entry points first. In veterinary clinics, we talk a lot about prevention because it is almost always easier than treatment. Home pest prevention works the same way.

How mice get in
Mice can squeeze through shockingly small spaces. A commonly cited rule of thumb is that an adult house mouse can fit through a gap around 1/4 inch (about 6 mm), roughly the width of a standard pencil. Young mice can slip through slightly smaller gaps.
If you have heard the “dime-sized hole” comparison, it is worth clarifying that a US dime is much larger than 1/4 inch. A dime-sized opening is more than enough space for a mouse.
Signs near entry points
- Rub marks or greasy smudges along edges where they travel repeatedly
- Gnawing on wood, weatherstripping, foam, or stored items
- Droppings that look like dark rice grains near walls or in cabinets
- Nesting material like shredded paper, insulation, or fabric in quiet corners
- Pet behavior such as intense staring at a stove, fridge, or a particular wall
Before you seal anything, do a calm, thorough walk-around inside and outside. Your goal is to find every gap that connects the outdoors to warm indoor spaces.
Entry point checklist
Set yourself up for success with a few simple tools: a bright flashlight, a pencil or chopstick (for probing gaps), a tape measure, and a notepad. If you want to be extra precise, take photos of each spot so you can track what you fixed.
Outside
- Perimeter of the home where siding meets the foundation
- Gaps around hose bibs, A/C refrigerant lines, cable or internet lines, and exterior outlets
- Garage door sides, bottom seal, and corners
- Weep holes in brick (these should not be sealed shut, but they can be protected correctly)
- Roofline and eaves, especially where fascia boards meet
- Vents: dryer, bathroom fan, attic, soffit, and crawlspace
Inside
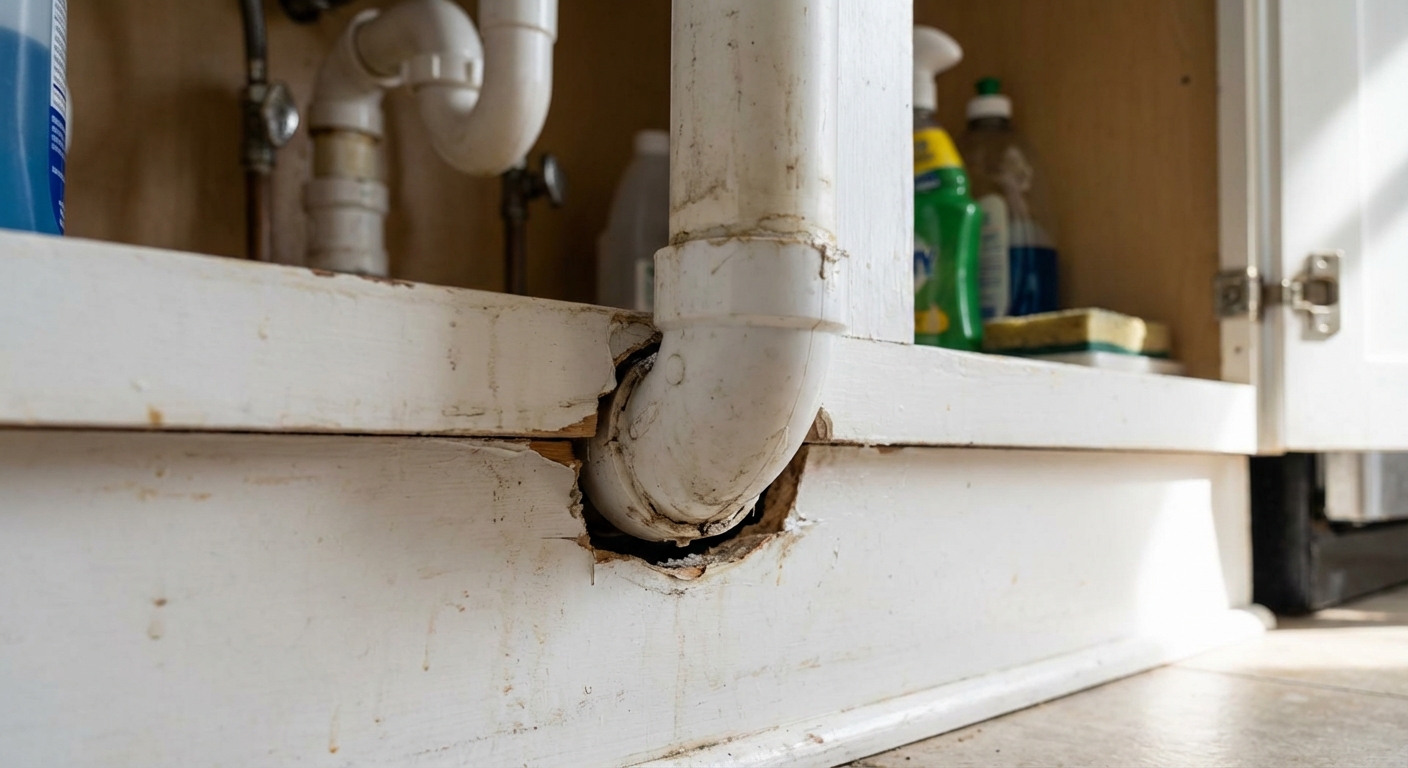
- Under sinks where plumbing enters walls
- Behind the stove, refrigerator, and dishwasher
- Utility rooms: water heater, furnace, and laundry hookups
- Pantry corners and the back of lower cabinets
- Attic hatch and any recessed lighting penetrations
Seal the big four
When people tell me, “I sealed a few holes but the mice are still here,” it usually means one of these major entry zones is still open. Here is how to tighten them up, step by step.
1) Front and back doors
- Install a door sweep that creates a tight seal at the threshold. Light showing under a door is an invitation.
- Replace worn weatherstripping along the sides and top of the frame.
- Check door frames for cracked trim or settling gaps and seal appropriately.
Pro tip: If you can slide a standard pencil under the door, treat it as too large.
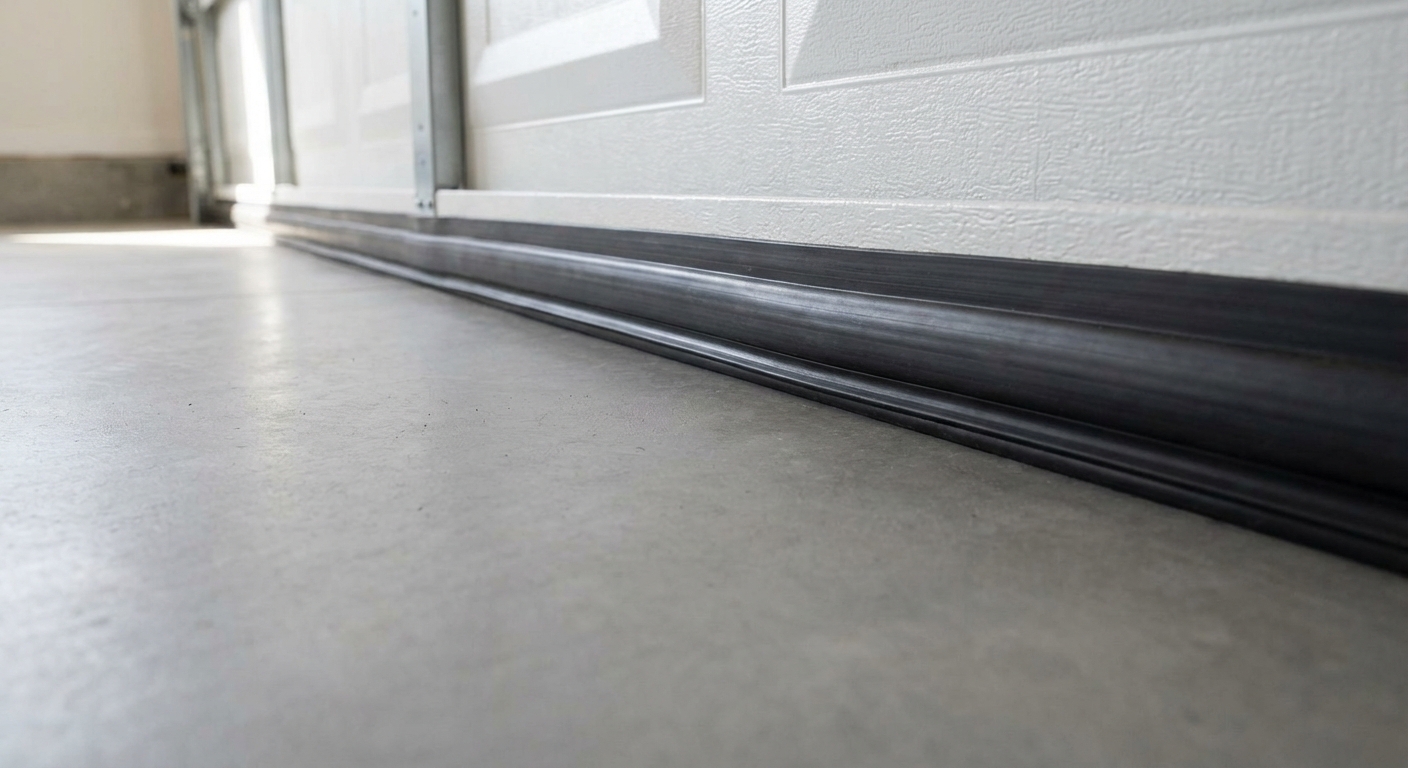
2) Garage door and connecting door
Garages are a top entry point because they provide cover, clutter, and warmth. Many mice enter the garage first, then move into the home through the connecting door, shared walls, or utility penetrations.
- Replace the bottom garage door seal if it is brittle, cracked, or flattened.
- Add side and top seals to reduce gaps along the door perimeter and jambs.
- Seal corners where the concrete meets framing, a common hidden access route.
- Weatherstrip the door between garage and house as carefully as your front door.
3) Vents
Vents must still function, so the goal is to protect them with the right covers, not plug them.
- Use metal vent covers with proper flaps for exhaust vents.
- Use 1/4-inch metal hardware cloth behind vent openings when appropriate (for example, some attic and crawlspace vents), and make sure it does not restrict airflow.
- Repair loose vent screens and replace plastic versions that can be chewed.
Important: Dryer vents need clear airflow and should not be covered with mesh that can collect lint. If you need rodent protection at a dryer termination, use a code-compliant dryer vent guard designed for dryers, or ask a qualified technician.
4) Utility lines and pipes
Where pipes and cables enter the home, gaps can form over time. Mice love these because they are quiet, hidden, and often lead straight to wall voids.
- Small gaps: Fill with a high-quality sealant, following product directions.
- Larger gaps: Pack with copper mesh or steel wool, then seal over it so it stays in place.
- Very large openings: Use a more durable patch material like sheet metal combined with sealant.
Best materials
Not all “gap fillers” are created equal. Some products look sealed but are easy for rodents to chew through.
Good options
- Metal hardware cloth (1/4-inch openings): great for vents and larger openings
- Sheet metal: ideal for gnaw-prone edges and bigger holes
- Copper mesh: flexible, resists rust, useful for irregular gaps
- Quality exterior sealant: use to lock metal barriers in place
Easy to chew through
- Expanding foam alone (foam plus metal mesh is stronger)
- Plastic vent covers in high-risk areas
- Low-quality rubber or vinyl weatherstripping that deteriorates quickly in heat or sun
Hidden entry points
These are the spots I see people miss most often. If you seal everything else but skip these, mice can still make themselves at home.
Crawlspace and foundation
- Make sure crawlspace doors close tightly and latch securely.
- Cover damaged screens with metal hardware cloth.
- Inspect the sill plate area for cracks where wood meets foundation.
Roofline and attic
- Repair broken soffits and gaps along fascia boards.
- Ensure attic vents are intact and properly screened.
- Trim tree branches away from the roofline to reduce access routes.
Brick weep holes
Weep holes help moisture escape, so they should not be blocked. If mice are entering through them, talk with a pro about approved protective options that preserve drainage.

If mice are already inside
Timing matters. If you seal a home tightly while mice are actively inside, you can end up trapping them in walls or living spaces.
- Start trapping right away in the areas you see activity.
- Seal obvious exterior entry points as you find them, but keep trapping until activity stops.
- After a full week with no new droppings or trap activity, do a second pass and seal the small, easy-to-miss gaps.
Cleanup and safety
If you find droppings or nesting, take a few extra precautions. In some regions, rodent waste can carry germs that you do not want to stir into the air.
- Wear gloves and, if you have one, a well-fitting mask.
- Ventilate the area.
- Spray droppings and nesting material with disinfectant (or a bleach solution mixed per label directions) and let it sit before wiping up.
- Avoid sweeping or vacuuming dry droppings.
- Wash hands well afterward.
Sanitation and storage
Sealing entry points is the foundation. The next step is making sure that if a mouse does get in, it does not find an easy buffet.
- Store pantry foods like cereal, rice, and pet treats in hard containers with tight lids.
- Feed pets on a schedule and pick up bowls at night, especially in garages or laundry rooms.
- Clean up bird seed and consider moving feeders farther from the house.
- Reduce clutter in garages and closets where mice like to nest.
- Keep outdoor trash in bins with secure lids.
Traps and pet safety
As a veterinary assistant, I have to add a loving but firm reminder: if you share your home with dogs or cats, be cautious with rodenticides. Many mouse and rat poisons can cause life-threatening bleeding disorders or neurological signs in pets. Secondary poisoning is also possible, and the risk depends on the product, dose, and exposure.
Safer options
- Snap traps placed inside secure, tamper-resistant stations
- Professional exclusion plus targeted trapping when activity is confirmed
- Monitoring with non-toxic stations so you know if activity returns
If you choose to use bait products, consider having a licensed pest professional handle placement, and keep all products completely inaccessible to children and pets.
Urgent: If you suspect your pet has eaten rodent bait or a rodent that may have consumed bait, contact your veterinarian or an emergency animal hospital immediately.
7-day plan
If you feel overwhelmed, break it down. Consistent small steps beat a stressful weekend of trying to do everything at once.
- Day 1: Exterior walk-around. Mark every gap you find.
- Day 2: Door sweeps and weatherstripping on main doors.
- Day 3: Garage seals and the door between garage and house.
- Day 4: Seal utility penetrations under sinks and in laundry rooms.
- Day 5: Inspect and secure vents with appropriate covers.
- Day 6: Declutter storage areas and switch food to sealed containers.
- Day 7: Set up monitoring or traps safely, then re-check all seals.
When to call a pro
Sometimes DIY is enough, and sometimes it is smarter to bring in help. Consider calling a licensed pest control professional if:
- You see activity during the day, which can indicate a larger population.
- You have repeated sightings despite sealing and trapping.
- You suspect attic or wall infestations.
- You have complex venting, a crawlspace, or a multi-level roofline that is hard to inspect safely.
Ask about exclusion-focused services. The best long-term results come from closing entry points first, then addressing any remaining mice.
Species note
This guide is geared toward house mice. If you suspect rats, the approach is similar but the materials and gaps involved are typically larger, and professional help can save a lot of time.
Bottom line
Mouse-proofing works best when you treat your home like a system. Seal the entry points, use chew-resistant materials, remove easy food sources, and keep pets safe with cautious trap and bait choices. You do not need to do it perfectly in one day. You just need to start where mice are most likely getting in and keep going.