
Master cat nail trims with a calm routine. Learn the right tools, how to hold your cat, where to cut (even on black nails), dewclaw tips, and what to do if y...
Article
•
Designer Mixes
How to Trim a Cat’s Nails

Shari Shidate
Designer Mixes contributor
Trimming your cat’s nails can feel intimidating, especially if your cat has a big opinion about being handled. I get it. As a veterinary assistant in Frisco, Texas, I have helped many families learn how to do nail trims safely and with less stress for everyone involved.
If you only read one thing: Trim just the sharp tip, reward generously, and do not forget the dewclaws.
The goal is not to “win” a wrestling match. The goal is to build calm, predictable routines so your cat learns: This is short, this is safe, and I get something good after.

Why nail trims matter
Indoor cats still need nail care. Overgrown nails can snag on fabric and carpet, split painfully, or curve and grow into the paw pad in severe cases. Regular trims also reduce accidental scratches during play and can help protect furniture.
- Typical schedule: often every 2 to 4 weeks, but it varies by cat (activity level, scratching habits, nail growth rate).
- Front vs. rear: front nails usually need trimming more often than rear nails in healthy adult cats. Senior cats often need maintenance on all four paws due to reduced activity.
- Older cats: sometimes need more frequent trims because nails can thicken and shed less efficiently.
- Polydactyl cats: sometimes have “hidden” nails that curl faster, so check all toes.
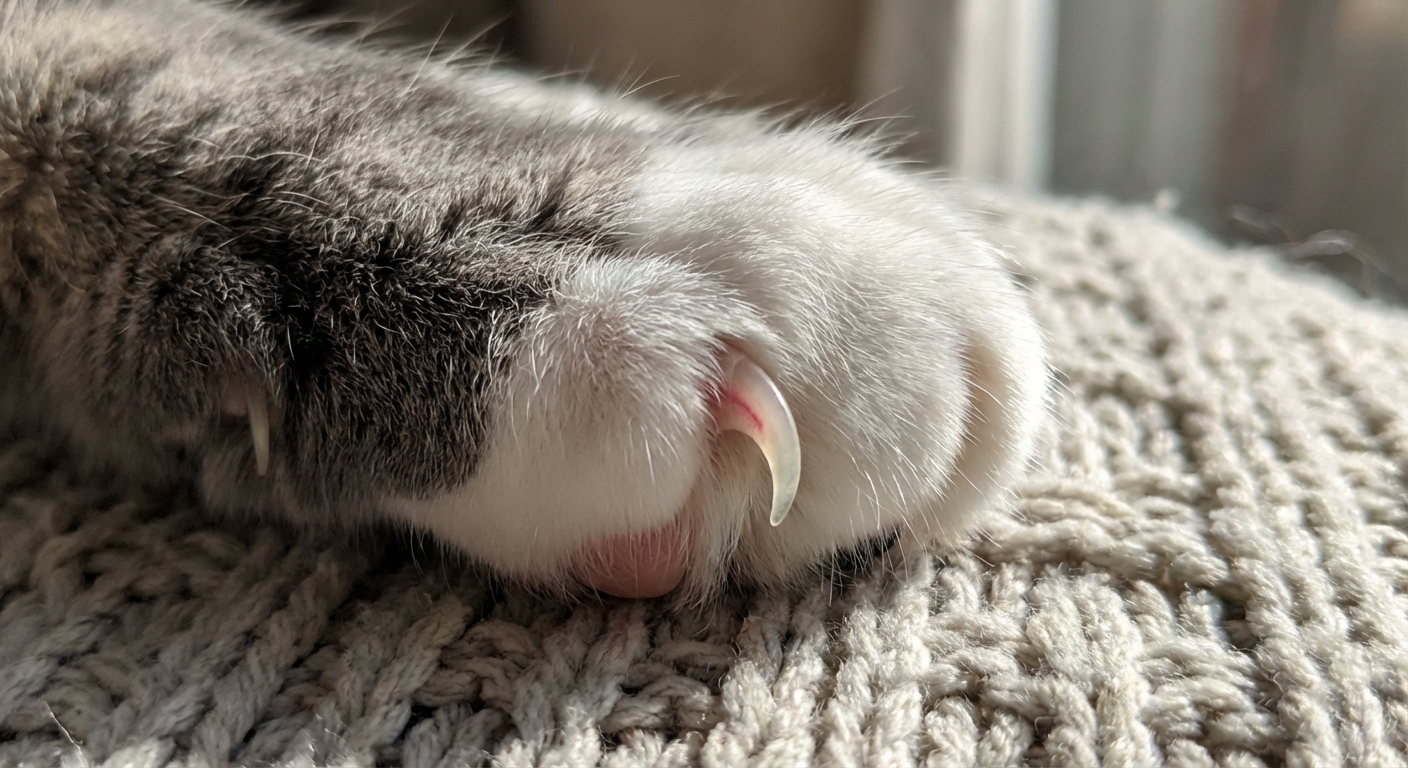
- Do not forget dewclaws: those little “thumb” nails sit higher up on the inner front legs. They do not touch the ground to wear down naturally, so they are the most likely to overgrow and can curl into the paw pad if missed.
Know the nail
A cat’s nail has a living pink area inside called the quick. Cutting into the quick hurts and bleeds. The safe part to trim is the sharp, curved tip beyond the quick.
Helpful visual: In light colored nails, the quick usually looks like a pink triangle inside the nail. In dark nails, trim tiny amounts at a time. You may see a darker, oval center forming at the cut surface as you get closer to the quick, but this is not foolproof. When in doubt, stop early and trim less.
Supplies that help
- Cat nail trimmers: scissor style or small guillotine style. Pick what feels stable in your hand. Sharp trimmers matter. Dull blades can crush or split nails.
- Treats: tiny, high value rewards. Churu style lick treats work wonderfully for many cats.
- Good lighting: a bright lamp helps you see the quick.
- Optional: styptic powder or cornstarch (for minor bleeding), a towel for a calm wrap, and a sturdy surface like a table or your lap.
Fear-free and cooperative care approaches favor gentle control, choice when possible, and frequent breaks. In my experience, heavy restraint tends to increase fear and can make future trims harder.
Helpful extra: Scratching posts and scratch boards are great for daily nail maintenance, especially for the front paws. They are not always a complete replacement for trims, but they can help nails shed and stay less needle-sharp.
Make it boring
Step 1: Teach paw handling
Before you even bring out the clippers, practice for a few days:
- Touch shoulder, then leg, then paw, then release.
- Press gently on a toe to extend one nail, then release.
- Reward after each short interaction.
Keep sessions under 30 to 60 seconds. Stop while your cat is still calm.
Dewclaw reminder: Practice touching slightly higher up on the inner front legs too. That is where the dewclaws live, and they are easy to overlook during training and trimming.
Step 2: Desensitize to clippers
- Set the clippers nearby at mealtime or treat time.
- Pick them up, then treat your cat.
- Let your cat sniff them if they want to, then treat.
If the clipper sound worries your cat, practice making the sound away from them, then gradually closer, pairing it with treats.
How to trim
- Choose the moment: after a meal or play session when your cat is naturally sleepy.
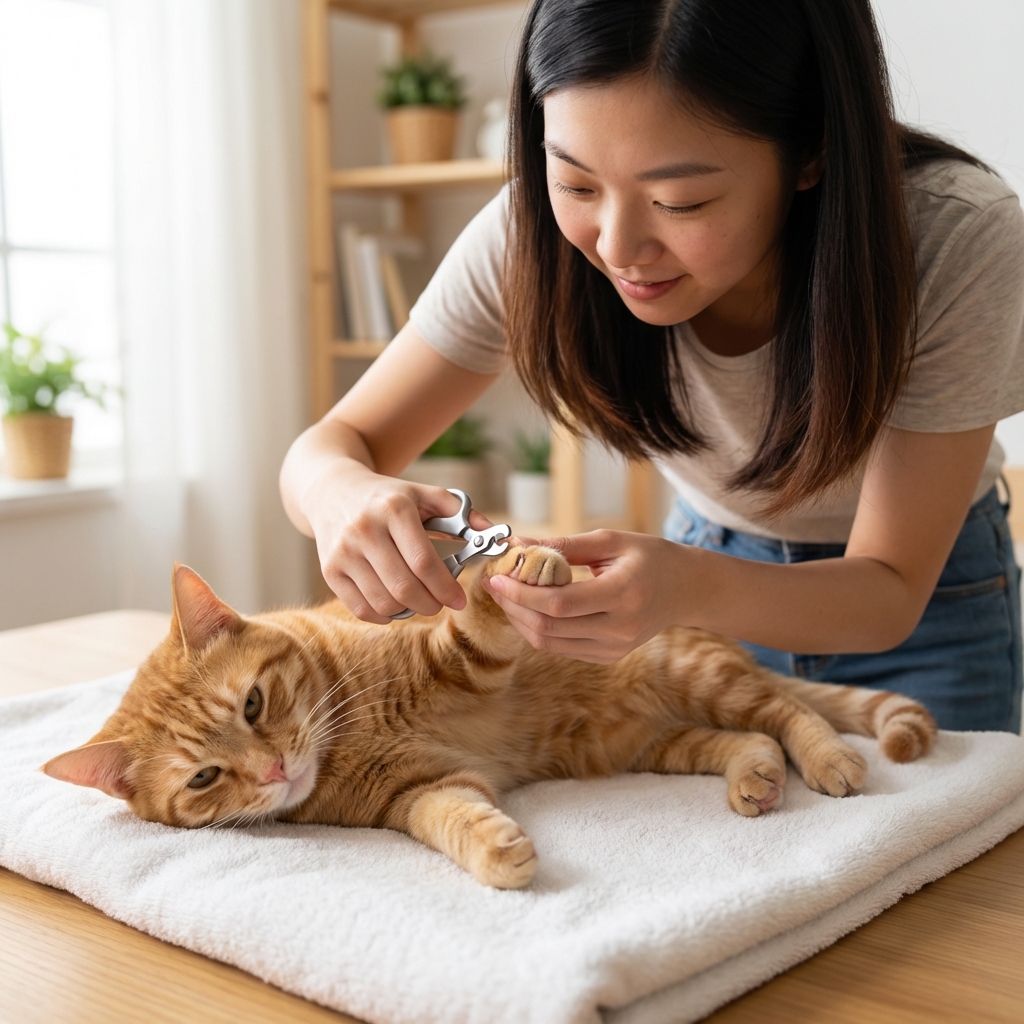
- Get into position: cat on your lap facing away from you, or on a table with your body close for security.
- Hold the paw gently: support the paw, then press the toe pad to extend the nail. On the front legs, remember to check for the dewclaw higher up on the inside.
- Trim the tip only: remove just the sharp point, usually 1 to 2 millimeters. Aim for a small, clean snip rather than a steep angled cut.
- Reward immediately: treat after every nail at first.
- Stop early if needed: it is completely fine to do one paw today and the rest tomorrow.
A good first goal is trimming one nail and ending on a win.
Restraint options
Low-restraint lap hold
Many cats do best sitting on a lap with minimal holding. Keep one hand on the paw you are working on and the other supporting the body.
Towel wrap for anxious cats
A towel wrap can help if your cat swats or panics, but it must be done gently. Think of it as a snug “hug,” not a pin. Wrap the body and leave one paw out at a time.
Two-person method
One person offers a lick treat and gently steadies the cat’s chest and shoulders. The other trims. This is often the easiest approach for beginners.
Safety tip: If your cat is hissing, growling, or trying to bite, stop. Pushing through teaches your cat that nail trims are scary and unpredictable.
If you cut the quick
It happens, even to professionals sometimes. Stay calm.
- Apply styptic powder with gentle pressure for 10 to 30 seconds.
- If you do not have styptic powder, cornstarch can help with mild bleeding.
- Avoid human pain-relief styptic products that contain numbing medications, since they can sting and some cats will try to lick them off.
- Keep your cat indoors and calm for a bit so the clot stays in place. Offering a lick treat can help distract them from the paw.
Call your veterinarian if bleeding does not stop within a few minutes, if your cat seems very painful, or if the nail is torn or partially ripped.
Mistakes to avoid
- Trying to trim all nails at once: build tolerance gradually.
- Cutting too much: trim less than you think you need to.
- Forgetting the dewclaws: check the inner front legs for the “thumb” nails every time.
- Chasing your cat: it turns trims into a scary game. Instead, set up calm sessions and let your cat come to you.
- Only handling paws during “bad stuff”: touch paws during cuddles too, then release.
- Skipping rewards: treats are not bribery. They are training.
When to ask a pro
There is zero shame in getting help. In fact, it can protect your bond with your cat.
- Cats with severe fear or aggression
- Cats with very thick, overgrown, or curling nails (especially dewclaws)
- Senior cats with arthritis who dislike paw handling
- If you feel anxious, because cats read our tension
Your vet clinic or a cat-savvy groomer can do trims quickly, and your veterinary team can also help discuss behavior plans or calming options if your cat needs extra support.
Quick routine
- Day 1 to 3: touch paws for 10 seconds, treat.
- Day 4 to 6: extend one nail, treat. Add a quick touch to each dewclaw area too.
- Day 7 to 10: trim one nail, treat, stop.
- Week 2: work up to a paw per session if your cat stays calm.
Small progress is still progress. The most trusted nail trim plan is the one your cat can tolerate without fear.