
Step-by-step dog tick removal with tweezers, what to do if mouthparts remain, aftercare warning signs, and proven prevention plus home and yard tick control ...
Article
•
Designer Mixes
How to Remove Ticks on Dogs

Shari Shidate
Designer Mixes contributor
Ticks are one of those “small but serious” problems I see pet owners stress about all the time. And I get it. They are creepy, they can be hard to spot under fur, and they can carry diseases. The good news is that with the right tools and a calm, step-by-step approach, you can remove a tick safely at home in most situations.
Quick note: If your dog is in pain, the area is very sensitive, the tick is in the eye area, your dog will not hold still, or you are unsure you can remove it cleanly, it is absolutely okay to have your veterinarian remove it.
Why ticks matter
Ticks feed on blood and can transmit infections. The risk depends on your region, the tick species, and how long the tick has been attached. Prompt removal is always a smart move. Transmission time varies by disease and tick, and while some infections often require longer attachment times, others may be transmitted more quickly.
Across the U.S., vets commonly discuss tick-related illnesses like Lyme disease (more common in some regions than others), ehrlichiosis, anaplasmosis, Rocky Mountain spotted fever, and others. Not every tick bite leads to disease, but every tick should be removed correctly.
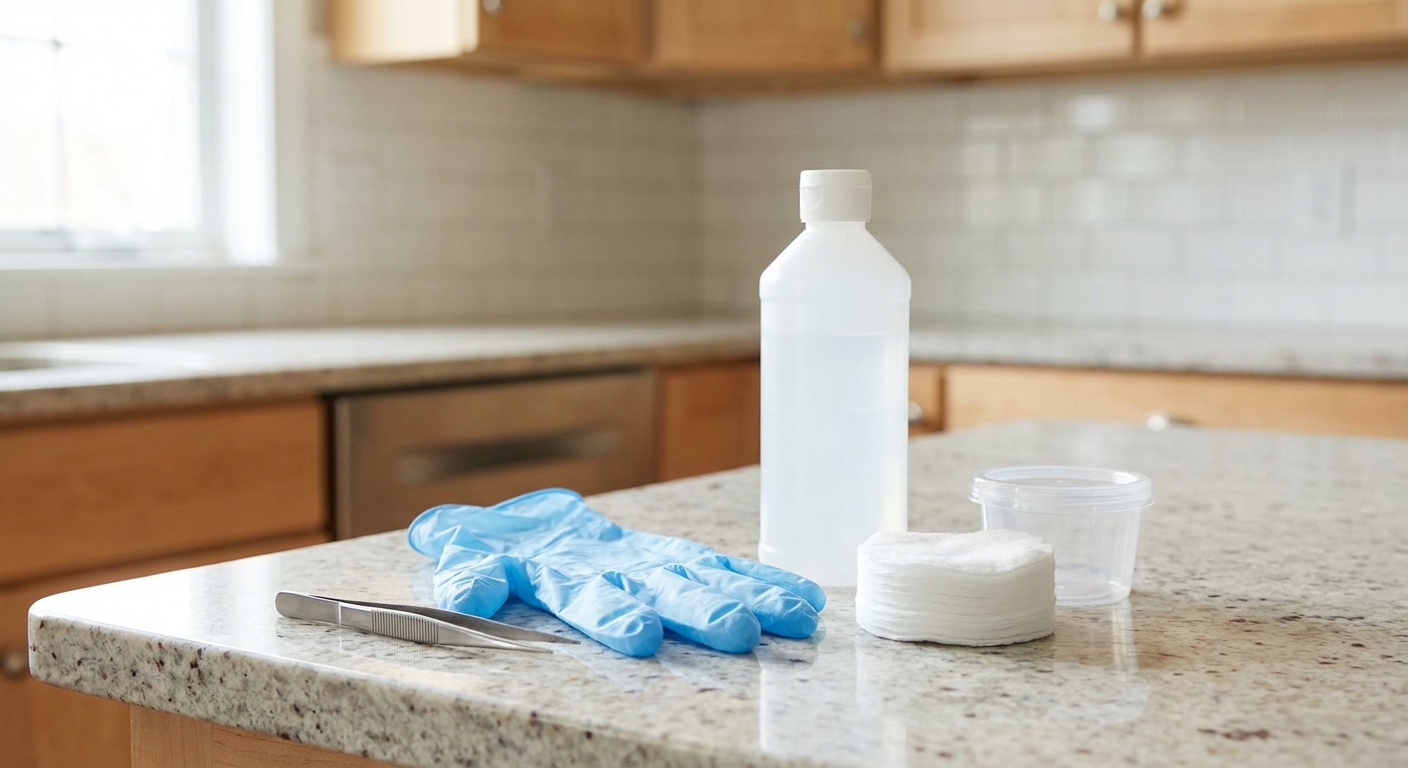
What you need before you start
Gather your supplies first so you are not scrambling mid-removal.
- Fine-tipped tweezers or a tick-removal tool
- Disposable gloves (optional but helpful)
- Rubbing alcohol (for cleaning tools and storing the tick if needed)
- Soap and water or pet-safe antiseptic for the skin afterward
- Small container with a lid (pill bottle or jar) if you want to save the tick
- Treats to keep your dog relaxed and still
Step-by-step: Tick removal
1) Keep your dog calm and steady
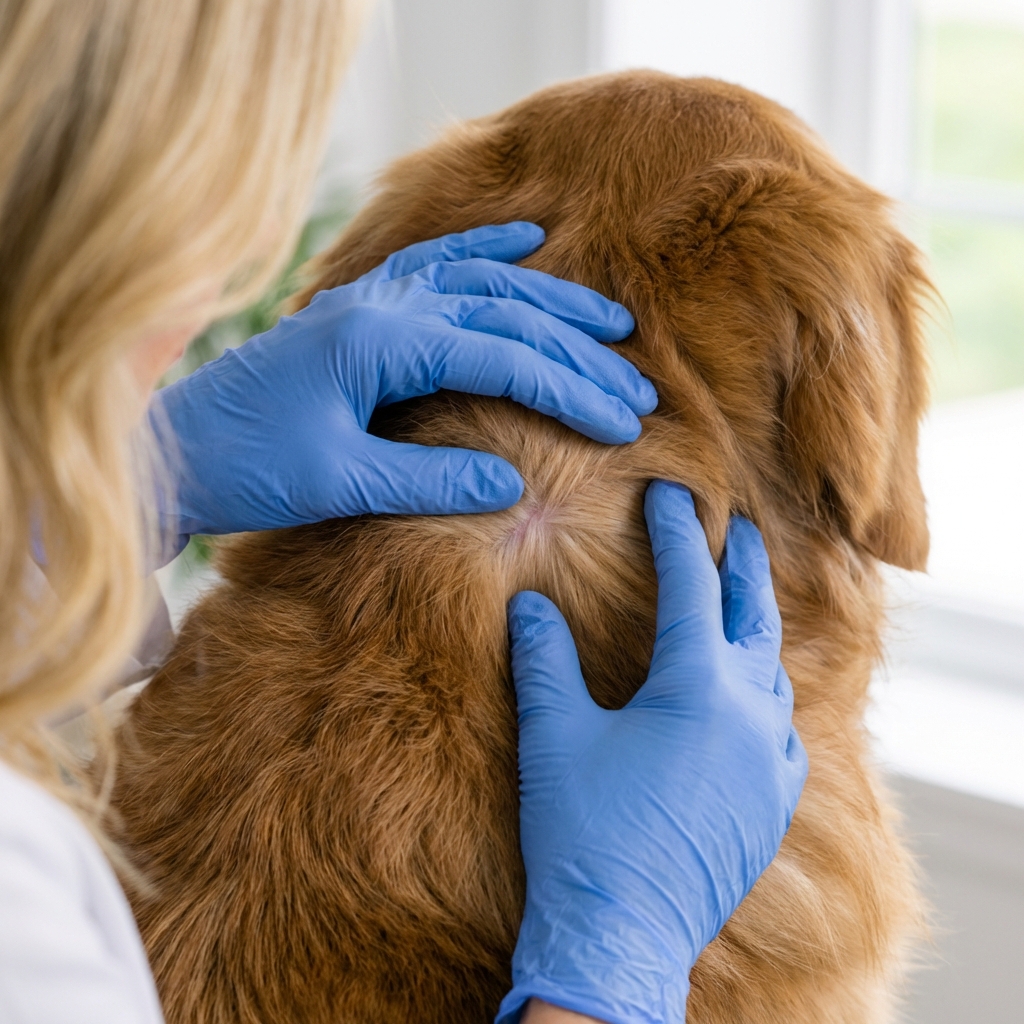
Choose a well-lit area. If possible, have a helper gently hold your dog and offer small treats. Keeping your dog calm makes removal safer.
2) Part the fur and find where the tick meets the skin
Ticks can look like a small dark bump, a seed, or a grayish oval if engorged. (Engorged means it has fed and looks swollen and larger.) Part the hair so you can see where the tick attaches.
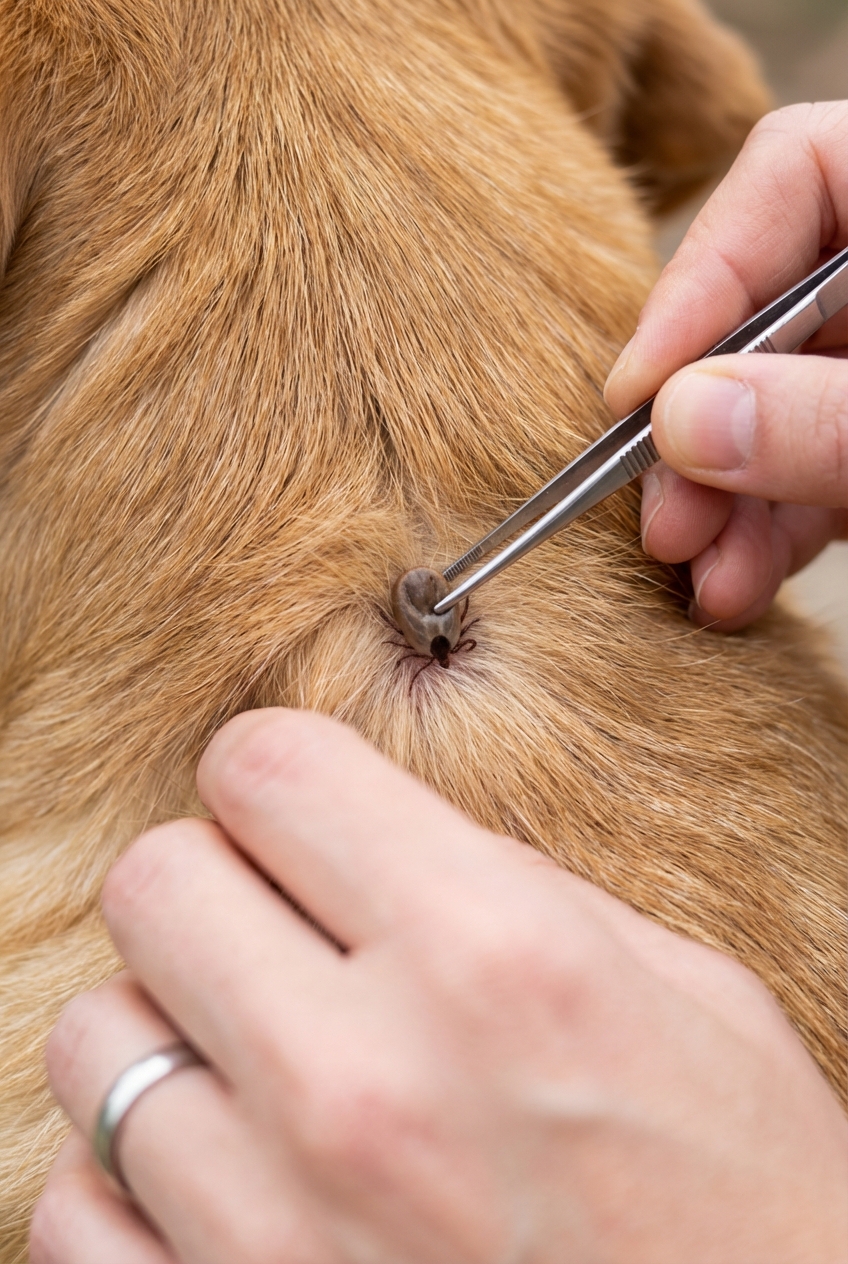
3) Grasp the tick close to the skin
Using tweezers, grab the tick as close to your dog’s skin as possible, aiming for the head and mouthparts area. Try not to squeeze the swollen body, especially if the tick is engorged.
4) Pull out with steady pressure
With tweezers, pull upward in a smooth, steady motion. Avoid jerking. In general, do not twist when using tweezers because it can make removal harder. Note: If you are using a specific tick-removal device, follow the manufacturer’s instructions, since some tools are designed to use a gentle twist or scoop motion.
5) Check the skin and clean the area
After removal, look at the bite site. Clean with soap and water, or a pet-safe antiseptic recommended by your vet. Wash your hands and disinfect the tweezers with rubbing alcohol.
6) Save the tick (optional but often helpful)
Place the tick in a sealed container. Many vets are fine with a small amount of rubbing alcohol in the container for storage and identification. If you think lab testing might be needed, ask your veterinarian how they prefer the tick stored (some prefer it kept dry or with a slightly damp paper towel).
7) Dispose of it safely if you are not saving it
If you are not keeping the tick, avoid crushing it with your fingers. Seal it in tape or in a small bag or container and throw it away. Then wash your hands.
Skip home remedies like burning the tick, painting it with nail polish, or using petroleum jelly. Those methods can irritate the tick and can cause it to release more saliva or fluids into the bite, which may increase disease risk.
What if the head breaks off?
This is common and understandably alarming. Often, what looks like “the head” is actually mouthparts embedded in the skin. If small pieces remain:
- Do not dig aggressively with a needle or sharp object. That can cause more trauma and infection.
- Clean the area and monitor.
- Call your vet if the area becomes very red, swollen, painful, oozing, or if your dog is persistently licking it.
Sometimes the body will naturally push out tiny remaining parts, similar to a splinter. But if you are unsure, a quick vet visit is worth the peace of mind.
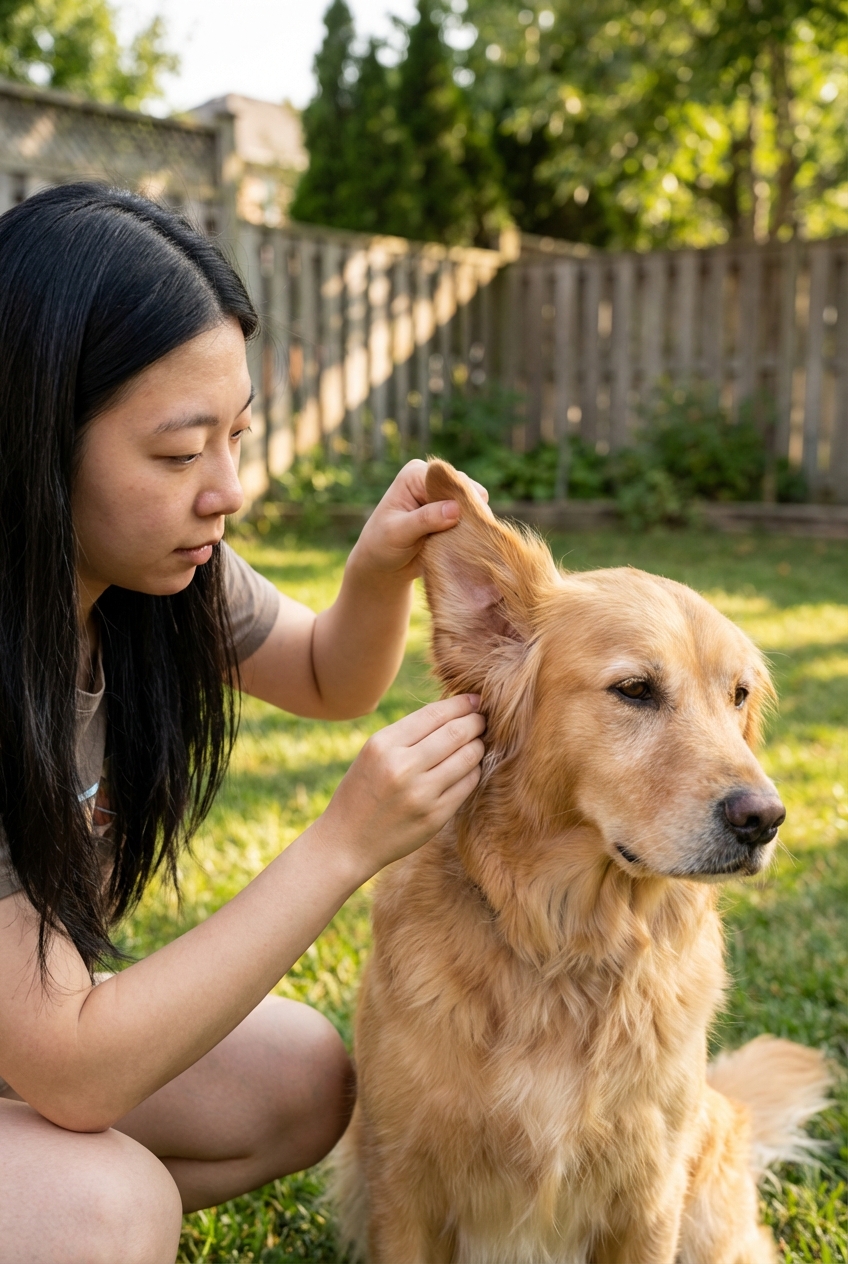
Where to look
Ticks love warm, tucked-away areas. After outdoor time, do a quick “tick scan,” especially during warmer months. (In many regions, ticks can be a year-round problem.)
- Inside and around the ears
- Under the collar
- Around the eyes and muzzle
- Armpits and groin
- Between toes and around paw pads
- Under the tail
When to call the vet
Home removal is usually safe, but please call your vet if:
- The tick is attached near the eye, inside the ear canal, or on sensitive tissue
- Your dog is too wiggly or may bite due to pain or fear
- You cannot remove the tick completely
- The bite site becomes increasingly red, swollen, warm, or draining
- Your dog develops symptoms days to weeks later, such as fever, lethargy, decreased appetite, limping, swollen joints, vomiting, or unusual bruising
Also ask your vet whether tick-borne disease testing is appropriate for your dog based on your area and exposure risk. And remember to check yourself too. Ticks can crawl off pets and onto people.
Aftercare
Most tick bites heal with minimal fuss, but I always recommend keeping a simple note on your phone of the date you removed the tick and where it was found. Monitor your dog for the next several weeks (and sometimes longer) for any changes.
- Normal: a small, mildly pink bump for a few days
- Not normal: expanding redness, significant swelling, pus, intense itching, or pain
- Whole-body symptoms: low energy, fever, limping, stiffness, decreased appetite
One more note: dogs do not always develop a clear “bullseye rash” the way people sometimes do, so do not wait for a specific rash pattern before calling your vet if your dog seems unwell.
Prevention
Tick prevention is truly the long-term solution. Talk with your veterinarian about what is best for your dog’s age, weight, lifestyle, and health history.
Common prevention options
- Oral preventives (chewables) prescribed by your vet
- Topical preventives applied to the skin
- Tick collars made for dogs (use only as directed)
Home and yard habits
- Keep grass trimmed and remove leaf litter
- Check your dog after hikes, tall grass, and wooded areas
- Wash bedding regularly
- Consider limiting access to high-tick areas during peak seasons
Important safety reminder: Never use dog tick products on cats, and keep cats away from topical dog products unless your vet confirms it is safe. Some ingredients are dangerous to cats.
FAQs
Should I use alcohol on the tick while it’s attached?
No. Use alcohol to clean tools and, if appropriate, to store the tick afterward, but avoid irritating the tick while it is still attached. Calm, mechanical removal is best.
How soon should I remove a tick?
As soon as you find it. Earlier removal reduces the time a tick can feed and can reduce the chance of disease transmission.
Can my dog get sick even if I removed the tick?
Yes, it is possible, which is why monitoring for symptoms over the next few weeks is so important. Most dogs do not develop illness, but quick action and observation are key.