Make nail trims safer and calmer with vet-backed restraint methods: lap hold, table tuck, towel purrito, and two-person help—plus quick safety and clipping...
Article
•
Designer Mixes
How to Clip a Cat’s Claws

Shari Shidate
Designer Mixes contributor
Clipping your cat’s claws can feel intimidating the first few times, but it is a very learnable skill. As a veterinary assistant, I have seen how a calm, consistent routine can make nail trims quicker, safer, and less stressful for everyone involved.
In this guide, I will walk you through what to use, how to hold your cat, exactly where to cut, and how to handle common hiccups like squirming, black nails, and fear. You do not need to “win” the whole trim in one sitting. Small successes build trust.

Why nail trims matter
Indoor cats can absolutely benefit from regular trims. It is not about convenience only. It is about comfort and preventing avoidable problems.
- Less snagging and tearing: Overgrown tips catch on carpet, blankets, and scratching posts, which can lead to painful breaks.
- Healthier paws: In some cats, nails can curl and press into the paw pad if they get too long, especially dewclaws that do not wear down as easily.
- Reduced accidental scratches: Especially helpful in homes with kids, seniors, or thin skin.
- Protects furniture while you train scratching behavior: Trims are not a substitute for scratching posts, but they can make training easier.
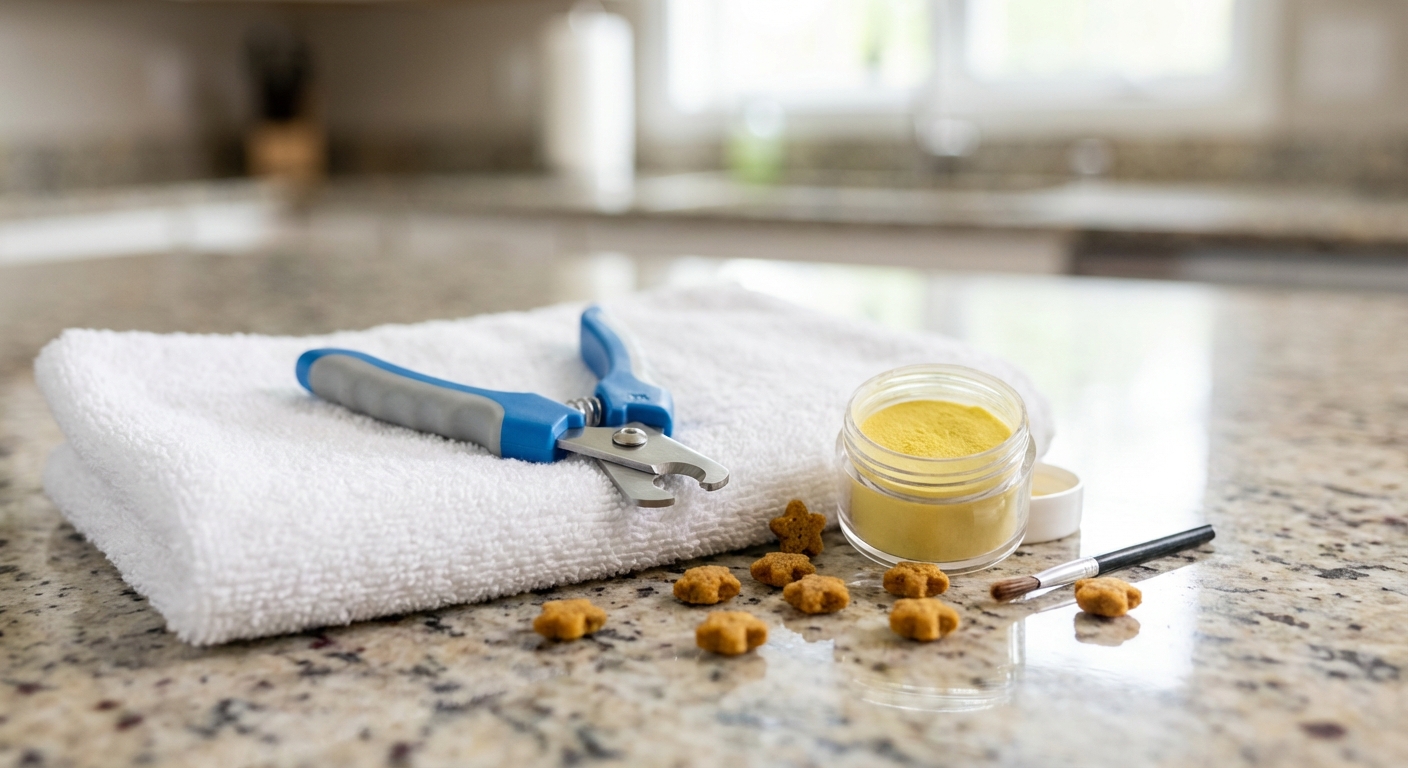
What you need
Gather everything first. A smooth setup is half the battle.
- Cat nail clippers: Scissor-style or guillotine-style made for cats.
- Good light: A bright lamp helps you see the quick.
- Towel or small blanket: For traction and optional “kitty burrito” wrapping.
- Treats: Small, high-value, and quick to chew.
- Styptic powder or styptic pencil: Just in case you nick the quick.
- Optional: A helper who can calmly offer treats and steady your cat.
About human nail clippers: In a pinch, some can work, but they may crush or splinter a cat’s nail. Cat-specific clippers are usually safer and easier to control.
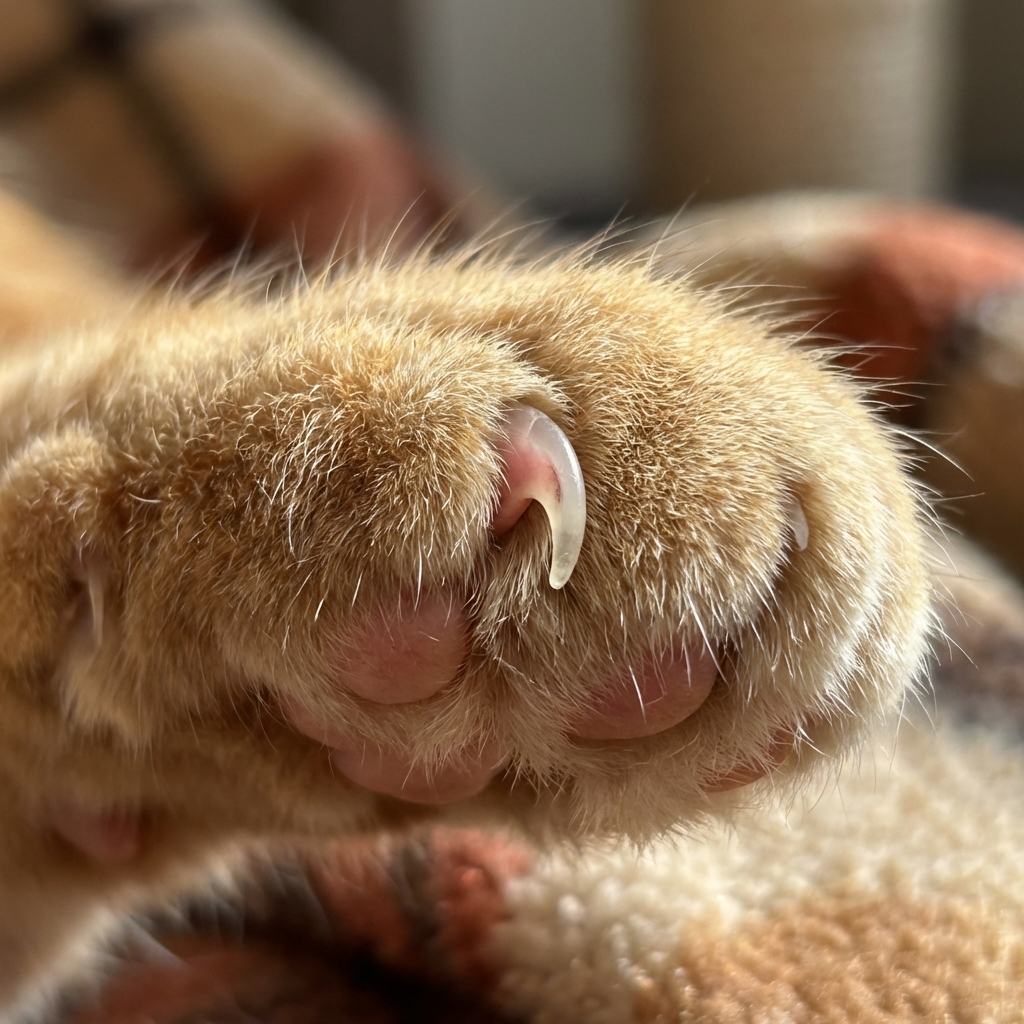
Nail anatomy
A cat’s nail is a hard outer sheath around the quick, which contains blood vessels and nerves. Cutting into the quick hurts and causes bleeding, so the goal is to trim only the sharp tip.
Light nails
With white or clear nails, you can usually see the pink quick. Trim the clear tip and stay a few millimeters away from the pink area.
Dark nails
With black nails, the quick is harder to see. Use a strong lamp and trim in tiny slivers. A safe approach is to take off just the needle-sharp tip, then reassess.
Set up for success
The biggest mistake I see is waiting until the cat is already stressed. Instead, build a routine your cat can predict.
- Choose the right time: After a meal or a play session when your cat is naturally relaxed.
- Start with paw practice: Once or twice a day, touch a paw, press gently to extend a nail, then treat. No clipping at first.
- Pick a consistent spot: Same chair, same towel, same calm vibe.
- Keep sessions short: One or two nails is still a win.
- Use gentle hands: Hold the paw securely, but do not squeeze toes or grip tightly. A lighter touch often gets less pushback.
- Avoid force: Skip scruffing and wrestling. If your cat is fearful, stop before it escalates and build cooperative handling over time.
If you and your cat are getting tense, pause. You can always come back later. Calm repetition beats one big stressful trim.
How to clip claws
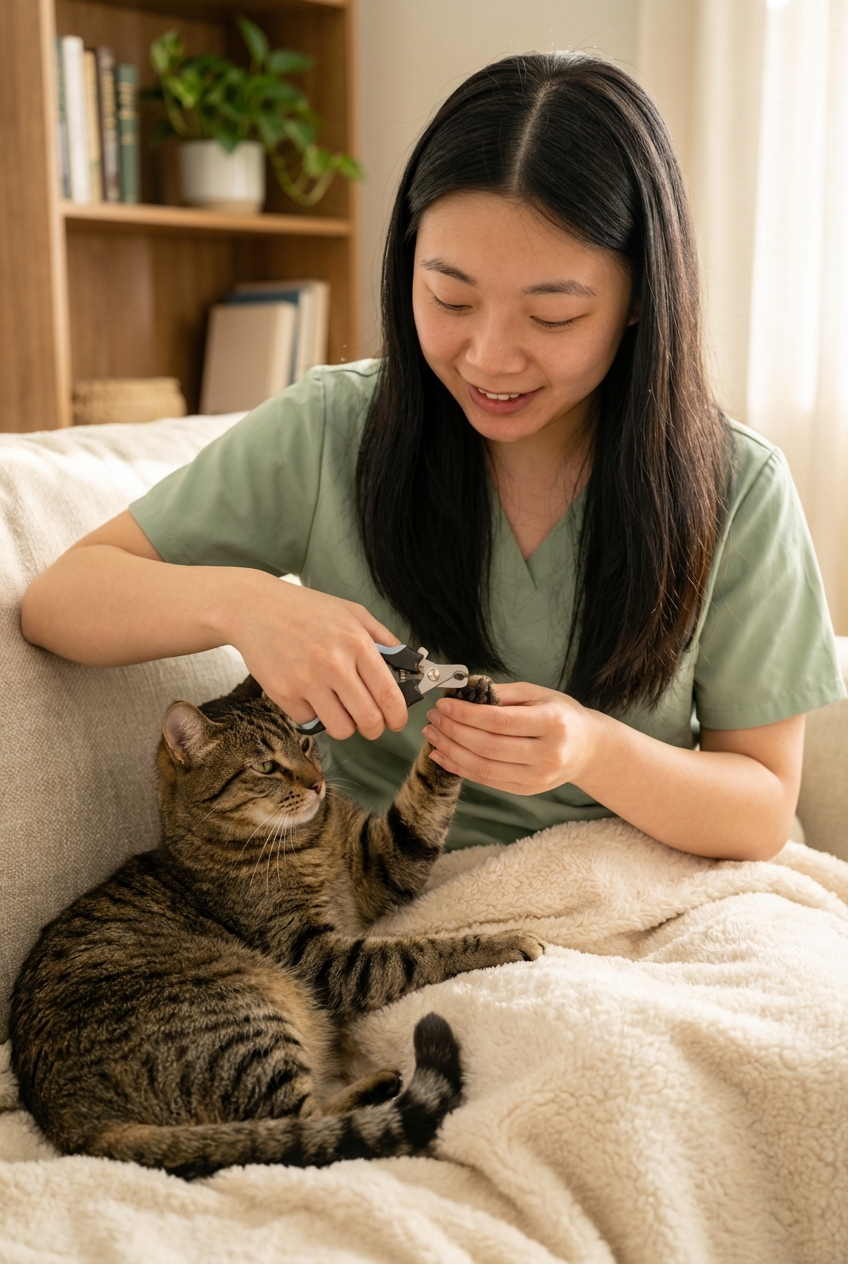
1) Get in position
Many cats do best sitting on your lap facing away from you, with their back against your stomach. Others prefer a table with a towel. If your cat is wiggly, wrap them loosely in a towel with one paw out at a time.
2) Extend the nail
Hold the paw gently. Use your thumb on the pad and your index finger on top of the toe, then press lightly to extend the claw.
3) Find the spot
Aim for the sharp hook at the end. Trim the tip only.
Do not forget the dewclaw. It sits a bit higher on the inside of the front leg and is easy to miss. Because it does not always wear down naturally, it can overgrow and curl.
4) Cut cleanly
Keep the blades perpendicular to the nail, like you are taking the very end off. Avoid angling the cut toward the quick. One small, clean snip is ideal.
5) Reward right away
Treat after each nail, especially at the beginning. This is how you teach your cat that nail trims predict good things.
6) Repeat as tolerated
Front feet usually need trims more often than back feet. If your cat starts pulling away, stop before it escalates.

How much and how often
Many cats do well with a trim every 2 to 4 weeks, but it can vary widely. Some cats need a quick touch-up every 1 to 2 weeks, while others can go longer depending on nail growth, activity, age, and scratching habits.
A practical target is to remove the sharp tip so it is less needle-like, without chasing a super short nail. Shorter is not always better if it risks the quick.
Kittens: They often acclimate quickly, but their nails are tiny. Use extra-small snips and keep it upbeat and brief.
If you cut the quick
It happens, even to professionals. The key is to stay calm.
- Apply styptic powder: Press a small amount onto the nail tip with gentle pressure for 10 to 30 seconds.
- No styptic available: Cornstarch can work as a temporary alternative for minor bleeding.
- Keep your cat still for a moment: Prevents re-bleeding.
- Wipe and recheck: A small amount of spotting can be normal, but it should stop quickly.
- Call your veterinarian if bleeding does not stop within a few minutes, if your cat seems very painful, or if the nail appears torn or split.
After a quick nick, take a break. Your cat will remember the experience, so it is better to stop and rebuild confidence later.
Common challenges
“My cat won’t let me touch paws.”
Go back to training basics. Touch, treat, release. Then progress to holding the paw for one second, treat, release. Build slowly.
“My cat turns into a tornado.”
Try shorter sessions, towel wrapping, or trimming when sleepy. If your cat becomes aggressive, it is safer to stop and ask your veterinary clinic or a groomer for help.
“Black nails scare me.”
Use a strong lamp, take tiny snips, and aim for just the sharp tip. If you are still unsure, have your vet team demonstrate the first time.
“My cat hates the clipper sound.”
Desensitize. Let your cat see the clippers, treat. Touch the clippers to the paw, treat. Clip a dry spaghetti piece near your cat to mimic the sound, treat. Then try one nail.
“The nail is thick or crumbly.”
Older cats can develop thicker nails. Some tools may crush instead of cutting. Scissor-style clippers often work better, and a veterinary visit can rule out nail bed issues.
Declawing vs trimming
Clipping claws is not the same as declawing. Declawing is an amputation of the last bone of each toe and can lead to pain and behavior changes. Most cats can be managed with a combination of regular trims, appropriate scratching options, and training.
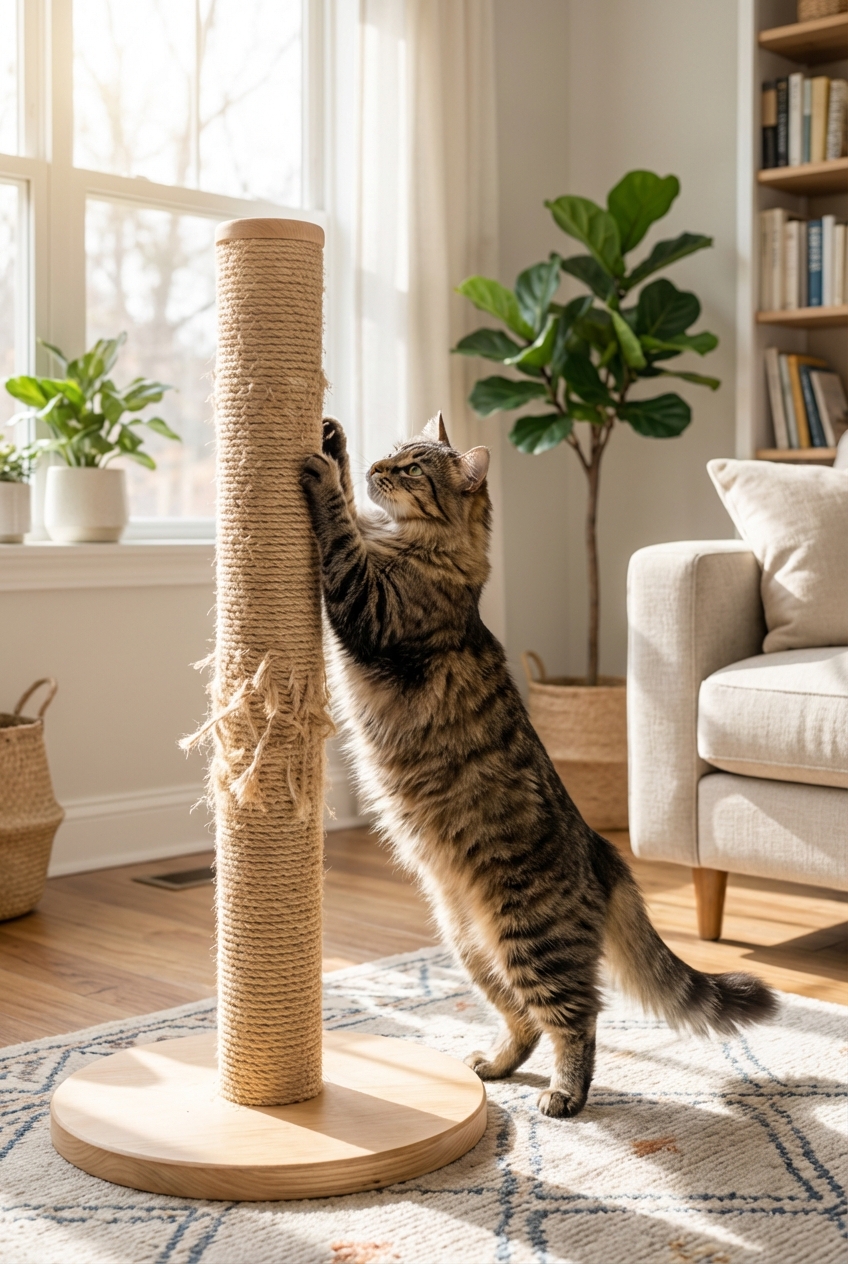
Support scratching
Trims help, but scratching is normal, healthy cat behavior. You can work with it.
- Offer multiple scratchers: At least one vertical and one horizontal.
- Place scratchers where your cat already scratches: Near furniture targets and near sleeping areas.
- Use catnip or silver vine: Encourage use in a positive way.
- Praise and treat scratching the right things: Yes, you can train this.
When to get help
Please reach out to your veterinarian if:
- Your cat shows pain when you touch the paws
- You see swelling, discharge, odor, limping, broken nails, or bleeding nails
- Your cat is extremely fearful or aggressive during handling
- You cannot safely restrain your cat without stress escalating
Many clinics can do quick nail trims, and we can also show you technique in a way that matches your cat’s temperament.
Quick checklist
- Trim when your cat is relaxed
- Use cat-specific clippers and good light
- Extend nail gently and clip only the tip
- Do not forget dewclaws
- Treat after each nail
- Stop early if stress rises and try again later
With consistency, most cats learn that nail trims are just another normal part of home care. You’ve got this, and your cat can too.